Friday, December 15, 2017

Orange Chicken by Pioneer Woman

I am a huge fan of Ree Drummond. I love her cooking style. Her recipes are quick, easy and not complicated, suitable for a busy wife and mother like me.

This recipe is adapted from Ree's Orange Chicken except I use real oranges instead of store-bought orange juice. I have few oranges that kids don't want to eat anymore, so I make good use of them. I also double the recipe considering I am feeding 4 boys.

I also use a cooling rack to drain the oil from the chicken. This makes the chicken oil-free and crunchier.


Orange Chicken

Prep: 20 MinutesLevel: Easy
Cook: 20 MinutesServes: 4
Ingredients
  • Vegetable Or Peanut Oil For Frying
  • Chicken
  • 4 whole Egg Whites
  • 2 Tablespoons Cornstarch
  • 4 whole Boneless, Skinless Chicken Thighs, Cut Into Bite Sized Pieces
  • Sauce:
  • 1/2 cup Orange Juice
  • 1 Tablespoon Soy Sauce
  • 1 Tablespoon Packed Brown Sugar (OR White Sugar OR Honey)
  • 1 Tablespoon Rice Vinegar (or Regular Distilled Vinegar)
  • 1/4 teaspoon Sesame Oil
  • Dash Of Salt
  • Dash Of Crushed Red Pepper, More To Taste
  • 1 clove Garlic, Pressed Or Minced
  • 2 teaspoons Minced Ginger
  • 1 teaspoon Cornstarch (additional)
  • Zest Of 1 Orange (optional)
  • 1/4 cup Water
  • 2 whole Green Onions, Sliced


Preparation

For the chicken: In a large bowl, whisk together the cornstarch and egg whites with a fork until almost frothy, about 1 minute. Add the chicken to the mixture and allow to sit for 5 to 10 minutes.

For the sauce: Meanwhile, put the orange juice, soy sauce, sugar, vinegar, sesame oil, salt, crushed red pepper, garlic and ginger (and orange zest, if using) in a small nonstick skillet and whisk together. Heat until bubbling and starting to thicken, about 3-4 minutes.

Whisk together the cornstarch and 1/4 cup water in a small bowl and add 1 to 2 tablespoons of the cornstarch slurry to the sauce. Mix in and thicken for 1 minute. (If sauce gets overly thick, just add in another 1/4 cup water and whisk in.)

Heat about 2 inches of vegetable oil in a heavy-bottomed pot until a deep-fry thermometer inserted in the oil registers 350 degrees F. In batches, carefully drop a few pieces of chicken into the oil (drop them in one by one to keep them from sticking together) and move it around, 2-3 minutes or until light golden. Let the pieces drain on a plate lined with paper towels for 2 to 3 minutes. Then drop them back into the oil for 1 minute to really solidify the coating.


Toss the chicken in the sauce and serve immediately with orange zest and sliced green onions on the top.


Taken from:  http://thepioneerwoman.com/cooking/orange-chicken/?printable_recipe=11820


Asian Chicken Curry at its Best

This is a very quick, easy and fast chicken curry that you can cook right in your home. This dish is always requested when friends come over, and always a hit on potluck parties.

We are a family of 6 so I always get my meat from either Sams club or Costco. Having 4 boys in the house, 6 lbs of chicken is just for one dinner.

I prefer using the real coconut milk from the real coconut, but it's hard getting one from the US. In the Philippines where I grew up, coconut is so easy to get.


I'm glad the Asian market in our area offers a variety of canned coconut milk. I prefer Arroy or Chaokoh brand because both are more thick and creamy.


For the curry, I use whatever is available in the Asian market or grocery store. For this recipe, I mix Indian Curry and the Vietnamese Curry powder I got from Asian Market. It tastes good especially with Morton seasoned salt. I got the perfect taste I want for my curry.


Easy Chicken Curry

6 lbs chicken thighs
2 cans of coconut milk
Oil for sauteeing
2 inches ginger (minced)
1 whole onion (chopped)
2 tbsp garlic (minced)
1 cup carrots (chopped)
3 potatoes
1 cup sweet green peas
Seasoned salt or plain salt ( according to your taste)
Black ground pepper
Chili pepper flakes (optional)
Curry powder (pictures posted below)
3 tbsp yellow curry
1 tbsp hot indian curry
Procedure
1. Cut the chicken into two pieces, remove skin. You can also use slices of whole chicken, drumstick or chicken breast, whatever you prefer. Set aside.
2. In a big pan, pour a little oil and sautee the ginger, onion and garlic for about 5 minutes.
3. Add the chicken. Stir the chicken for about 10-20 minutes or until the water is gone and chicken is turning a bit of light brown.
4. Add the curry powder. Stir for about 5 minutes, until the chicken absorbs the curry powder.
5. Add salt and pepper.
6. Add two cans of coconut milk.
7. It is important to turn the heat between medium and high, once the coconut milk boils, add the potatoes.
8. Check if potatoes is half way done. This will take about 15 minutes.
9. Add the carrots and peas. Taste it again. If blunt, add more salt.
10. Put heat to low and cook this for about 30-1hr uncovered.
11. If you want spicy, add a little of dried chili pepper flakes.
12. Serve with hot jasmine rice.

Bone-in chicken thigh is always tastier than white meat

NOTE:
  • The low heat will cook the coconut milk and will add more aroma to your dish. You will see your curry turning to a very creamy dish.
  • If you will use 3 lbs or less, use just 1 can of coconut milk. But if you want more soup base, 2 cans will do.
  • OPTIONAL ADD ONS: sliced mushrooms, thai basil leaves, peas, eggplant, or bamboo shoots. 
  • If you want it super spicy, use 1-2 sliced jalapeno peppers instead of chili flakes.


The picture might not do justice on the taste of this curry as I am only using a regular phone for photos, but I assure you, you would want to cook this again :)

The Ultimate Italian Sausage Stuffed Mushroom

November and December are the two months of nonstop Holiday celebration which makes everyone busy cooking and spending. For business owners, this is the Q4 so add that on the busy-ness list.

This is a signature dish of my family every year. I normally make this with my stepdaughter when she's around, some sort of bonding for the two of us. This year she wasn't around for Thanksgiving, nevertheless, she still made this for her mom and grandma.


This recipe only requires few ingredients and I usually make this about a day or two before the celebration, so it's one dish out of the way with the rest of my to-do cooking list.

I used to bake this using just a baking pan or silicon sheet, but I notice, it always comes out saggy and watery. I have tested using a cooling rack for this recipe and I got great result.... it's gone in a heartbeat during Thanksgiving dinner lol

I forgot where I got this recipe, but surely it's via google. For paprika lovers, you can add a dash of paprika on each mushroom cap before cooking. This makes the stuffed sausage aromatic. I did not put paprika in this batch though because I simply ran out of it, and no time to drive to the grocery.


INGREDIENTS:

24 large whole fresh mushrooms
1 lb Italian sausage
1 8-ounce package cream cheese, softened
2 bunches scallions, chopped
1/2 cup grated parmesan ( Plus more for toppings)
1/4 cup Italian breadcrums
1/2 tsp salt
1/4 tsp cracked black pepper
dash of paprika for toppings (Optional)


HOW TO DO IT:

Preheat oven to 350 degrees F.  Place the cooling rack on a baking pan and spray with oil. I use Pam or any olive oil spray.

Wash the mushrooms and dry it with paper towel. Break off the stems. This will hollow out the center of the mushroom.

Don't throw the stems. Cut them or put into food processor. Set aside.

In a skillet over medium-high heat, cook the sausage until the color turns into brown. Set aside until the sausage is no longer hot.

In a mixing bowl, combine the cooked sausage and the rest of the ingredients except the paprika. Mix all ingredients well.

Take each mushroom and using a spoon, fill each cap with the stuffing. Top it with the additional parmesan cheese and paprika.


Arrange the mushrooms evenly on the wire rack.


Place in the oven and bake for 25 minutes.


It's as simple as that!!! Great side dish to serve this Holiday and it could be your bonding moment between you and your kids. This is the first dish I taught my stepdaughter and she did it so well. Now, its her own take-along dish to parties, couldn't be more proud!!


Sunday, November 19, 2017

Easy Oven-Baked Salmon


It's been a while since I last post a recipe in my blog. A lot of going on in my life. Being a full time wife and mother, and self-employed, it's taking a lot of my time. 


I miss sharing my recipes so here I am again :)


My stepdaughter's craving for a baked salmon. I don't have much in the fridge as I have not visited the grocery store for a while now, so I just gather whatever I have in the fridge for her baked salmon.


Here is what I came up with by combining the recipes I found online and the spices I have in my pantry and fridge.


I used my cooling rack for this recipe for optimal airflow which makes my salmon evenly baked. Spraying of oil before cooking makes clean up way more easy. 


Baked Salmon with Mayonaise


6-7 salmon fillet (thawed)
1/2 cup mayonnaise
1/4 cup grated parmesan cheese
1 tsp garlic powder
1 tsp oregano
1 tsp parsley
Juice of 1/2 lemon

  1. Preheat oven to 400 F.
  2. Mix the last 4 ingredients. Set aside.
  3. Take out the cooling rack and place it in a baking pan. Spray it with an olive oil spray or Pam.
  4. Place salmon on top of the cooling rack.
  5. Season it with a little salt and pepper.
  6. Baste the mayo mixture on top of each salmon fillet.
  7. Bake the salmon for 35 minutes and broil at 450 F for another 2-3 minutes.
  8. Serve with your favorite veggies or rice pilaf.


Wednesday, March 2, 2016

All Time Favorite Dessert, Leche Flan!

Leche flan is the Filipino version of the very famous dessert called " Creme brulee". In the Philippines, we usually melt the sugar and let it sit in the custard cup or "llanera" before pouring the flan mixture. We cook it by steaming and once done, let it cool and turn it upside down. The melted sugar will coat the flan, no need to use a torch to caramelized sugar. It's usually served on Fiesta, a catholic celebration and gathering, birthdays, and any other occasions.

I have tried different recipes of Leche Flan, but my favorite is the recipe from my cousin, Sunshine. She shared her recipe with me when I went visit them in North Carolina sometime in 2013. It's a very easy recipe. I will use the same recipe using Kitchenatics cooling and baking rack instead of a steamer pan.

                                                              www.kitchenatics.com


I used a half sheet pan for this rack. If you don't have a half sheet pan, you can use any baking pan, as long as it won't snug. I placed the rack on top of my half sheet pan and set it up inside the oven.  I pour about 4 cups of hot water in the pan. The water actually depends on the depth of the pan, there should be at least 1/4 inch left. Preheat the oven at 350F while preparing the flan ingredients.

In a nonstick small pan, dissolve 1 cup of white sugar. Cook it slowly on medium to low heat. Watch it closely to avoid burning. Once melted, pour it in the custard cup or leche flan molder. Let it sit for about 10 minutes.


Meanwhile, prepare the following:

10  large egg yolks
1    can of 12 fluid oz. evaporated milk
1    can of 14 oz. condense milk
1 tsp. vanilla
little zest of lemon ( optional)

Combine all ingredients and mix it using a stand mixer for about 10 minutes. It's faster that way. A wire whisk can be used too. It will just take a while. Pour the mixture slowly in the custard cup. 


Cover all custard cups with a foil. This will help in the steaming process inside the oven.


Bake for 50 minutes. You can also check by inserting a small toothpick on the flan. If the toothpick comes out clean, the flan is done.


Take the flan out of the oven and let it cool. I usually let it cool for few minutes and place it inside the  fridge. When it's time to eat, I simple invert it and serve.


This particular flan has a slice in the middle because my son, Charles, was in a hurry to eat it. He is a flan monster. He totally loves it! 


I am not a fan of too much sugar. The flan has already enough sweet to satiate my palate. Instead, I like to top it with cinnamon powder. I made a flan specific to what I like using the same procedure and flan ingredients. 


                                                           www.kitchenatics.com


I love it! I have a new kitchen buddy that I can use as a cooling rack, a roasting rack, and a steaming rack too. All in one. Grab one now!


Bacon In The Rack

I never liked cooking bacon in the pan. The fat from the bacon always ended up landing in my face. It seemed to be its favorite spot. When we started launching our very own Kitchenatics cooling and baking rack, I need to find and try new recipes using it to prove how efficient and reliable the product is. To prove that, as an owner, I need to try it myself.

I did some readings about baking the bacon and I found different tips on how to do it. I tried it using the rack. www.kitchenatics.com

I bought a pack of thick bacon strips, this way once the fat is gone, there is still left over. I covered the half sheet pan with aluminum foil to lessen my work of washing off the grease. I placed the cooling and roasting rack in it and laid the bacon strips. 
www.kitchenatics.com


I set the oven temperature to 400F and set timer for about 20-30 minutes. I checked it after 15 minutes. I never turn the bacon as what most people say I should do. I was busy doing something so I just checked it from time to time.

No more oil that splutters all over. No more bacon smell lingering in the whole house. No oily gas range to clean with. The bacon's perfect! It's crispy. The fat from the bacon dripped in the half sheet pan. I can't believe how much fat the bacon strips had.


My family enjoyed these bacons as much as I do. I actually ended making another batch. I have tried turkey bacon too and works well. I cleaned the rack without sweating. I soaked it in warm water with dishwashing liquid for 2-3 hours while I was studying. No sweat at all!


www.kitchenatics.com


This is really a great way to cook bacon. I find it so much easy and I can do other things too while waiting.


Wednesday, February 3, 2016

Smoked Boston Pulled Pork... How I Got It Right!

We were having a get together party with my friend and her husband last weekend, I couldn't decide what dish to cook. This is always the hardest part of being a host... to come up with an easy but palatial dish that will make them utter "OH WOW!" after their first bite. Something that will leave a mark, that taste that will have them ask for more. After searching and researching, I came up with the dish that I have been cooking every special occasion. They haven't tasted this yet. It's my "Pulled pork with a twist."

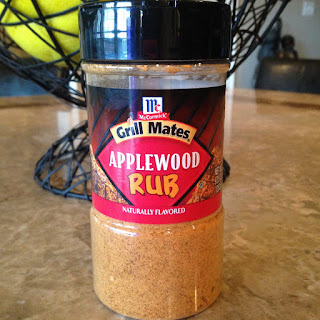
I started by creating my favorite meat flavor injection, which is a combination of 4 cups apple juice, 1 cup apple cider, 1/4 cup sugar, and 1/4 cup salt. I then transfer to a pot until hot, but not boiling. I then inject it in a 5-8 lbs of Boston Butt. Once all of the solution is injected, I add my all time favorite dry applewood rub from McCormick. The first part is then done. I then transfer the pork butt start my smoker it for 12-14 hours at 225 F. This actually makes the pulled pork so good, it's SMOKING!! Yes, smoking! The pulled pork retains the smoky flavor, and is oh so tender!


Even with this preparation and cooking process, sometimes my pork ends a little dry. I need to improve on my consistency. So I ended up searching and researching again on YouTube, blogs, oh you name it. Finally, I came across with an article about BRINING. This is when you need to soak the meat in a brining solution and leave it there for 48 hours. The meat will absorb all the flavors from the solution which makes the flavor longer and the meat tastier.

I watched a video in YouTube about how to brine. I apologize, I forgot the channel's name, but I will update my blog once I find his name and channel.

I am so excited to try it. I ended up modifying some parts because that is what I love to do, experiment! You can expect me trying to add/change/delete something that is not part of the recipe itself. But you can also expect that the food will still end as good, if not better.


This BRINING SOLUTION calls for a 5-8 lbs pork butt.

8 cups apple juice
1 cup apple cider vinegar
1/2 cup brown sugar
3/4 cups salt
3 cups water
1/2 cup Worcestershire sauce
3 tbsp. applewood dry rub or any of your favorite meat rub
3 dry bayleaves

Mix everything in a big pan, then pour in another big container with the meat in it. The meat should be submerged in the brining solution. Cover and put in the fridge for 48 hours. This is good for a 24-hour brining too, but 48 hours absorbed the flavor longer.

After 48 hours, remove the meat from the brining solution (DON'T TAP IT DRY). Lay the meat in a baking pan, cover the meat with your favorite dry rub. I use the same apple wood rub since I love the smell and flavor of the rub. Transfer the meat to your roasting rack ( Of course, I use our very own Kitchenatics cooling and roasting rack). You need to make sure that there is pan underneath the roasting rack in case some juice from the meat will leak. Our roasting rack fits the half sheet bake pan perfectly.Smoke it at 225F for 4 1/2 hours. Spray the meat with apple juice every hour to keep the moisture.


                                                              www.kitchenatics.com 


After 4 1/2 hours, transfer it in a foil (enough to wrap the meat), spray some apple juice again, then wrap the meat with the foil. Return it on the roasting rack. Transfer the roasting rack to your oven, bake it for another 4- 4.5 hours at 275F or until the internal temperature reaches 195-200 degrees.


 It is best to use meat thermometer to check its doneness. This has been my issue for quite sometime. I didn't use meat thermometer. Finally, I purchased a digital thermometer. I can get the exact meat temperature without hassle. The estimated time in the oven depends on how many pounds of boston butt you have. In this recipe, I use 6 lbs. but the brining solution can submerge up to 8 lbs of Boston Butt.

Once the internal temperature reach 195-200 F, let it rest for two hours. Check it first to make sure your desired meat color and tenderness has reached, if not, throw it back in the oven for couple of minutes. This doesn't happen though whenever I use my digital meat thermometer. I will post a separate blog about the best one that I have got so far. I tried 4 different kinds.

After 2 hours, shred the meat. You can use any meat drippings from the pulled pork as sauce. Simple heat it, and add your favorite barbecue sauce to thicken it. It is actually good. I always love Sweet Baby Ray's Barbecue Sauce

                                                                               Get the rack at: www.kitchenatics.com


I did quite well, thank you very much. My friends loved it! We made pulled pork sandwich out of it, along with some side salad for the adults. For my kids who are big rice-eaters, I made a separate Fajita Rice Pilaf to go with it.


Available for purchase at:  www.kitchenatics.com